Pages

Saturday, July 29, 2017

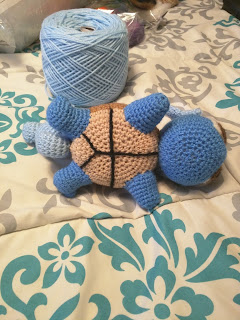
Wartortle!


 So this is my first post in a very long time! I made this Wartortle for my brother a few months ago following one of Aphid777's amazing patterns. I followed her Squirtle pattern which can be found here!

The main reason I decided to post again is because I made up my own patterns for the ears and tail, and I wrote them down so I could give back to the free pattern community! I finally got around to typing them up today, so I figured I'd make a post before I forgot. 😊

Let me know if there is any confusion or if you catch a mistake! I'm always happy to help!

Ears (make 2)
1) 4sc in the magic ring (4)
2) inc all the way around (8)
3) (1sc, inc) x2, 4sc (10)
4) (2sc, inc) x2, 4sc (12)
5) (3sc, inc) x2, 1sc, inc, 1sc, inc (16)
6) (4sc, inc) x2, 2sc, inc, 2sc, inc (20)
7) (5sc, inc) x2, 3sc, inc, 3sc, inc (24)
8-9) sc all the way around (24)
10) (5sc, dec) x2, 3sc, dec, 3sc, dec(20)
11) (4sc, dec) x2, 2sc, dec, 2sc, dec(16)
12) (3sc, dec) x2, 1sc, dec, 1sc, dec(12)
13) (2sc, dec) x2, 4sc (10)
14) (1sc, dec) x2, 4sc (8)
15) dec all the way around (4)
Fasten off and leave a long tail to attach


Tail
Note: I don’t have an exact count on how long each end is. I forgot to count it, but I know each end is about 16 rounds so adjust the length as necessary 😊

1) 4sc in the magic ring (4)
2) inc all the way around (8)
3-16) sc all the way around (8)
17) (1sc, inc) x2, 4sc (10)
18) (2sc, inc) x2, 4sc (12)
19) (3sc, inc) x2, 1sc, inc, 1sc, inc (16)
20) (4sc, inc) x2, 2sc, inc, 2sc, inc (20)
21) (5sc, inc) x2, 3sc, inc, 3sc, inc (24)
22) (6sc, inc) x2, 4sc, inc, 4sc, inc (28)
23) (7sc, inc) x2, 5sc, inc, 5sc, inc (32)
24-26) sc all the way around (32)
27) (7sc, dec) x2, 5sc, dec, 5sc, dec (28)
28) (6sc, dec) x2, 4sc, dec, 4sc, dec(24)
29) (5sc, dec) x2, 3sc, dec, 3sc, dec(20)
30) (4sc, dec) x2, 2sc, dec, 2sc, dec(16)
31) (3sc, dec) x2, 1sc, dec, 1sc, dec(12)
32) (2sc, inc) x2, 4sc (10)
33) (1sc, inc) x2, 4sc (8)
34-48) sc all the way around (8)
49) dec all the way around (4)
Fasten off and leave a tail. Roll each end in and attach to middle section. I used the tail on one end and some scrap yarn of the same color for the other end. (See pictures for reference)

Here are a few progress pictures I took for my brother along the way.

Marking out where all the pieces need to go for assembly
All pieces attached! Time for details!

First attempt at the eyes didn't go so well...
Second attempt was MUCH better
Needle felted details on the bottom of shell

Thursday, October 23, 2014

Bird Skulls

All of my bird skulls are now complete!


As you can see there are 9 big ones and 2 smaller ones. The two small ones go where the hood attaches to the ring. I was going to make 10 bigs ones but I ran out of Sculpty and we decided that 9 was probably plenty to make it around my waist.

I also took a picture of the blanket we bought to use for the hood and maybe some other parts of the costume.

Brown Patchwork Faux Fur Throw by Better Homes and Gardens
It is extremely soft and the two sides can be separated so we have lots of fabric.

My mom is going to the city while I am in class today to buy more fabric and foam for the shoulder armor so I will update again soon!

Costume Check List
  • Boots  
  • Fur for Boots
  • Navy Leggings  
  • Bird Skulls  
  • Spikes for Skirt
  • Knee Pads
  • Shoulder Armor
  • Fabric for Arm Wraps
  • Fabric for Skirt
  • Leather Strips for Skirt
  • Red T-shirt
  • Fabric for Hood  

Tuesday, October 21, 2014

I Made a Bloglovin' Account!

<a href="http://www.bloglovin.com/blog/13048091/?claim=z4ww7srpy6t">Follow my blog with Bloglovin</a>

Monday, October 20, 2014

Halloween is SOOO close!!!

So school has been absolutely crazy these past two semesters and I'm going to try to find more time to post on here.... but to kick off the holiday season I'm going to be posting the process of making my Halloween costume!

My boyfriend and his mom are convinced that my cartoon look alike is Astrid from How To Train Your Dragon 2.

I am seriously stoked to make this costume even if I only have 11 more days to do it... It will happen :)

So I made all the bird skulls originally out of homemade model magic... but after finding some Sculpty in my house I decided to start over and take a little more time to make them look better.

This is what I ended up with on my first try with sculpty!
The Sculpty clay looks way better..... trust me... I'm not an artistic person at all and I'm still embarrassed to put my other ones on here(and I thought they looked pretty good at first haha...)

Anyways... my mom is my main help and we need to make a trip to the city for fur trim and some other things.. but so far I already own the boots I need (and we will wrap them in fur) and my mom bought me blue leggings and a faux fur/ sherpa blanket to cut up for the hood and other parts of the outfit. I will put a check list at the bottom of all my post to keep track of progress!

Feel free to comment and ask questions!

Wish me luck!


Costume Check List
  • Boots  
  • Fur for Boots
  • Navy Leggings  
  • Bird Skulls
  • Spikes for Skirt
  • Knee Pads
  • Shoulder Armor
  • Fabric for Arm Wraps
  • Fabric for Skirt
  • Leather Strips for Skirt
  • Red T-shirt
  • Fabric for Hood  

Saturday, March 22, 2014

Minion!

Well this week I was on Spring Break so I figured I should add some of my projects onto here so others could see :)
I made a minion about 5 months ago for my boyfriend as an early Christmas gift. It took me a long time to find a pattern to use and I ended up altering it to customize the minion just for him. It was my first time ever changing a pattern and I was extremely surprised at how well he turned out.


If you would like to make your own minion, I used the pattern from WolfDreamer HERE.
I also highly recommend getting patterns from her blog. She does an amazing job with all of her original designs and has a wide variety of patterns :)

Have a great day!

Wednesday, March 12, 2014

French Press Cozy!

So my brother and his girlfriend, Mattea, came over about a month ago and Mattea brought her french press. She started making tea and had the french press wrapped in a towel to keep it warm. So when I walked in the kitchen, my mom goes... "Taylor, make Mattea a cozy for her french press so she doesn't have to keep wrapping it up." So I spent the rest of the day making a cozy (without a pattern) and I am pretty darn proud of how it turned out :)


Its definitely not perfect and there are a couple things I would change if I made another, but overall Mattea loved it and I think it turned out nice! :)

Sunday, December 22, 2013

My First Post! Unicorn Complete!

For my first blog post I would like to share the unicorn I just finished today. I have been working on it for a couple weeks now because hobby lobby ran out of eyes and the project got put on hold for a few days.

The pattern I used is Lil' Baby Unicorn from Little Yarn Friends and can be found HERE.

So here are the pictures :)


I wanted her to be fairly big so I used an H hook and 15 mm eyes. I decided that I wanted the mane and tail to be more like real hair so I spent all day today making each curl... I also added buttons to the legs to add a little character and I added a cute little bow to the tail :)

I'm giving this little beauty to my boyfriend's niece for Christmas on Wednesday so hopefully she will like it!

Merry Christmas!